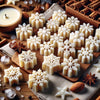
Cocoa Flurry Snowflake Wax Melts Recipe
January 02, 2024
2 min read
Cocoa Flurry Snowflake Wax Melts Recipe

Welcome to a cozy DIY project perfect for the winter season! We'll be creating delightful snowflake wax melts that not only look charming but also fill your space with the warm, inviting aroma of hot cocoa. This easy recipe is perfect for beginners and uses simple ingredients.
Equipment List
- Double Boiler: For melting the wax safely and evenly.
-
Stirring Spoon: Preferably a metal or silicone spoon for stirring the wax, colorant, and fragrance.
-
Thermometer: To monitor the wax temperature, ensuring it doesn't get too hot.
-
Measuring Cups: For accurately measuring wax, fragrance oil, and colorant.
- Protective Gloves:To protect your hands from hot wax.
-
Clean Pouring Jug: For transferring the melted wax into the mold with precision.
Ingredients
Instructions
-
Melting the Wax:Begin by melting the soy wax flakes in a double boiler. Keep the heat medium to avoid burning the wax.
-
Adding Color and Fragrance:Once the wax is fully melted, remove it from the heat. Stir in a few drops of the Jute Premium Liquid Colorant until you achieve the desired color. Then, add the Hot Cocoa Fragrance Oil - about 10% of the total wax weight is a good starting point.
-
Pouring the Wax:Carefully pour the melted wax into the Snowflake Mini Silicone Mold. Fill each cavity to just below the rim.
-
Cooling and Unmolding:Allow the wax to cool and harden completely. This may take a few hours. Once set, gently pop out the wax melts from the mold.
Conclusion
And there you have it! Your very own homemade snowflake wax melts, ready to use or give as thoughtful handmade gifts. These wax melts are a perfect way to bring a touch of winter magic indoors. Enjoy the process and the delightful scent they bring toyour home.
Remember, you can always adjust the amount of fragrance or colorant to suit your preferences. Happy crafting!

